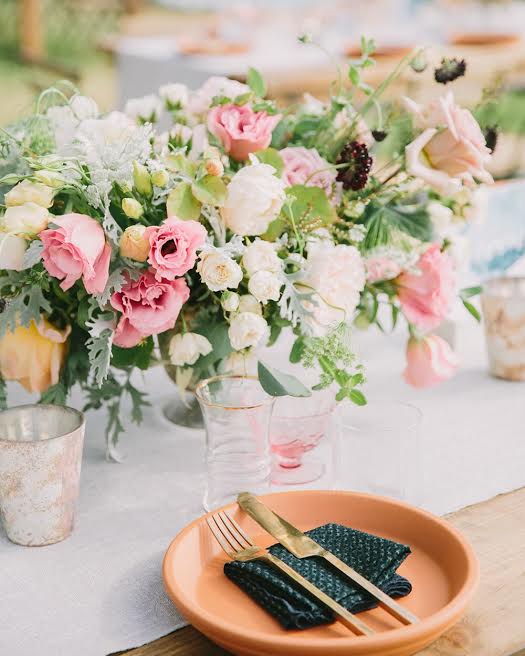
The only thing we love more than good food is good food plus a beautiful table, and over the years one of the things we’ve grown to adore most is creating a beautiful tabletop – whether it’s pulling pieces from Hostess Haven, Borrowed Blu or Casa de Perrin, or curating our own custom collection for our clients, the options are endless! We tend to veer a little less traditional, and while there’s no one right way to set a table and we love playing with the unexpected, there are some great jumpstart guidelines that we tend to turn to, and we thought we’d share them with you.
General Table Setting Rules:
To start, let’s begin with a few general table setting rules that apply to each type of table setting:
- Utensils – For starters, utensils are placed in the order in which they are used with the first ones placed on the outside. For example- the salad fork is placed on the outermost edge of the left side before the dinner fork as salads are typically served before the main course!
- Forks – Usually placed on the left side of the main service plate, with the exception of the dessert fork which can be placed above the plate and the oyster fork which is placed on the right side.
- Knives – Knives are placed on the right side of the plate, with the cutting blade facing inwards towards the plate. The exception is the butter knife – placed on the butter plate, with the blade pointing downwards and left.
- Spoons – Spoons are typically placed on the right side of the plate, with the exception of the dessert spoon which is placed directly above the service plate.
- Water glass – Always the largest of the glasses! Typically placed on the right side of the charger directly above the flatware with the knives pointing toward the stem or the center of the glass.
- Placement – All utensils should be placed about an inch from the edge of the table and lined up evenly from the bottom ends.
- Set only what you use – Only set the utensils that will be used throughout the service. If there is no soup, there’s no need to set a soup spoon!
With the basics out of the way, it’s time to learn about each type of table setting!
1. Formal
The formal table setting is fitting for weddings, holiday meals, or any occasion when more than three courses will be served. You may also find the formal table setting at high-end restaurants that serve multiple courses. In a formal table setting, the service plate comes with each course, so it’s not necessary to include it when setting the table.
Out of all the table settings the formal table setting is the most symmetrical, so the utensil placement is the most important factor as this table setting includes the most utensils.
The overall result is a well-balanced table setting that’s ideal for formal dining!
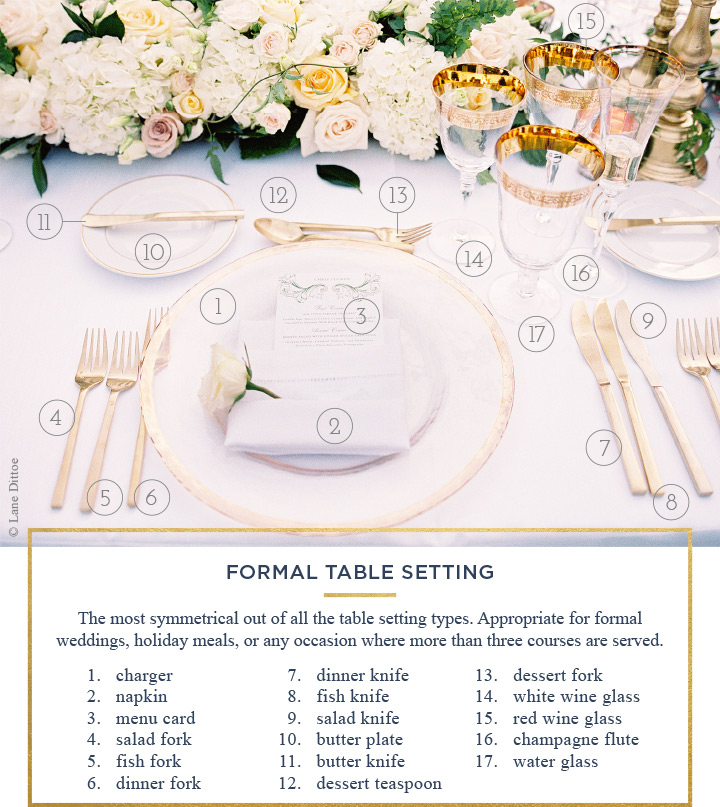
Formal Table Setting Elements
Center
- Charger – The charger delineates the space and welcomes the guest to the table. Each course is set on top of the charger, including the salad course, soup course, and meat or fish course. The charger is typically cleared along with the dinner plate. Note: Placement of the charger, if one is included, is the same in all three table setting types!
- Napkin – The napkin is typically folded and placed on top of the charger before service begins.
- Menu card – The menu card can be placed on top of the napkin or inserted into the folds of the napkin for a more formal display.
Left-side
- Salad fork – Salad is the second course that is served, so the salad fork is placed at the outer left edge of the table setting and is usually smaller than the dinner fork.
- Fish fork – Next to the salad fork is the fish fork. In a formal setting, the fish or seafood course is served after the salad. Traditionally, the shape of the fish fork is designed to optimally lift the flesh away from the bones. In a dinner without a seafood course, the fish fork is used as the second course fork.
- Dinner fork – The dinner fork is placed to the immediate left of the charger or service plate and is usually the largest of the three forks.
Right-side
- Soup spoon – In a formal service, soup is the first course that is served and so the soup spoon is placed on the outer edge of the right side.
- Salad knife – The salad is served after the soup, so the corresponding knife is placed to the left of the soup spoon.
- Dinner knife – The dinner knife is placed to the immediate right of the service plate, corresponding with the placement of the dinner fork.
Top
- Butter plate – This plate is placed to the top left corner of the place setting.
- Butter knife – This is placed on top of the butter plate, pointing left and the blade facing down so that the handle is towards the guest.
- Dessert teaspoon – Placed above the entrée plate, this is the smallest of the spoons.
- Dessert fork – Placed beneath the dessert teaspoon, and can be used for the fruit course.
- White wine glass – The white wine glass is placed closer to the guest, as it is usually served before the red wine — along with the second course.
- Red wine glass – The red wine glass is larger and taller than the white wine glass.
- Champagne flute – The champagne flute is placed to the outer right of the glasses, because it accompanies the first toast.
- Water glass – This glass is the largest of the glasses, and is placed closest to the guest directly above the knives.
2. Informal
The informal table setting is probably the most widely used. It is a great fit for casual weddings, dinner parties, or any occasion that needs a just bit of dressing up without being too formal.
There are fairly subtle differences between the informal table setting and the formal table setting. In an informal setting there are fewer utensils involved and fewer glasses as well, and a butter plate is not always included.
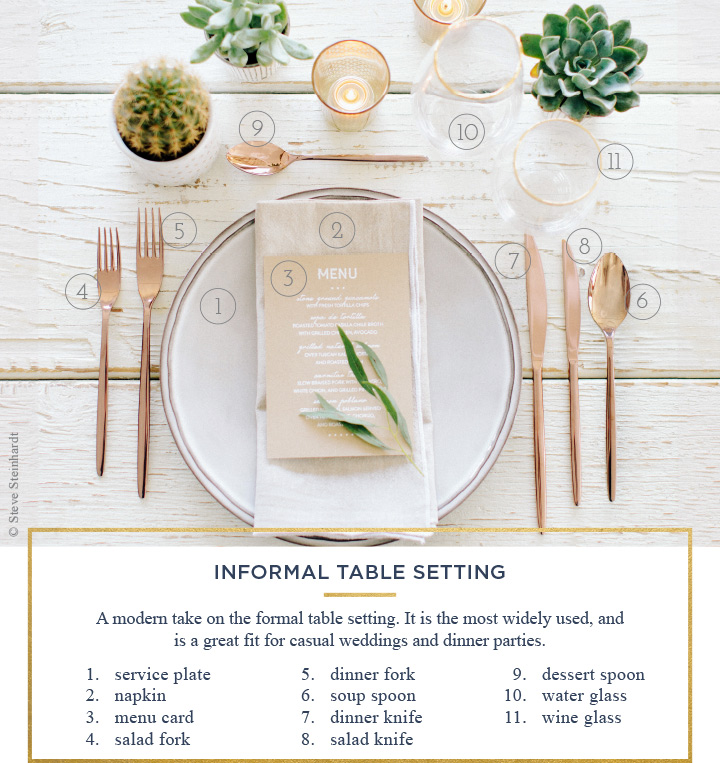
Informal Table Setting Elements:
Center
- Service plate – The service plate, or entrée plate, is placed on top of the charger (if one is provided), and is usually taken away before the next course.
- Napkin – The napkin can be folded and placed on top of the plate before service begins, but with an informal setting we like to get creative with the napkins and play around with different folding patterns and placements to add some dynamic to the table!
- Menu card – Similar to the formal setting, the menu card can be placed on top of the napkin or inserted into the folds of the napkin for a more formal display, but can also be placed next to the charger if desired.
As with the rest of the tabletop, all that’s left is to trim down the dessert fork, fish fork, fish knife, and a wine glass to transition the setting from formal to informal. We sometimes like to add a champagne coup as well above the water glass, forming a triangle of sorts between the glasses.
3. Basic
The basic table setting is essentially a simplified version of the informal table setting, with just a few subtle differences. For example, no dessert utensils are included and it may include fewer glasses. The basic table setting is great for daytime brunches, casual dinner parties, or for fancy dinners at home.
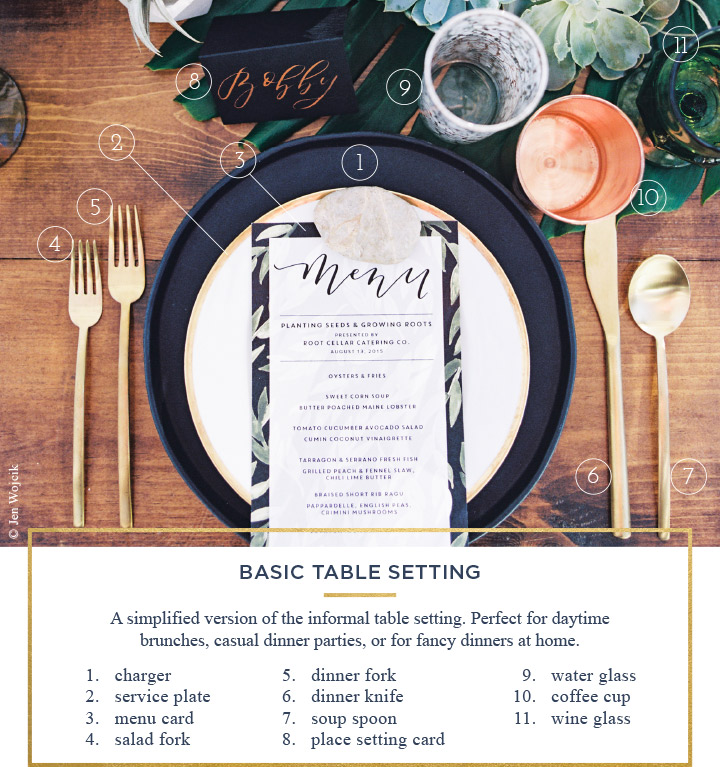
Basic Table Setting Elements:
For a basic table setting, trim down the champagne coup, salad knife, and the dessert spoon, and there you have it! A basic table setting for the every-day occasion. 🙂
Many thanks to FTD for collaborating with us on this and and sharing with us these guideline photos. Cheers to the weekend and to having good conversations over food with friends!


")


")


